
PURCHASED
Listen, somehow I’ve ended up with a large amount of newer Sally Hansen releases, all sitting on my desk, just staring at me, waiting to be swatched up. I can’t fully explain it, there’s just something about seeing a set of their Miracle Gel bottles all lined up, in a beautiful new color story, I just want them all. And then on the other side they’ll have cute little collaborations from their Insta-Dri line. And then suddenly, with all of these different lines all concurrently releasing new collections, I end up with just a pile of new Sally Hansen polishes. It’s a problem.
Now, I can’t just let them go to waste, I can’t just let them collect dust, unreviewed – they need to have their PURPOSE. (I’m making this all more poetic than ‘I’ve spent money on these, I should get content out of them’). So this is all to say there’s going to be a lot of Sally Hansen reviews coming up later. I know you’re curious as you glance at those polishes sitting on their little displays as you browse in Walgreens. I know you want to know, “are those any good?, are they worth the $12?”
So I bought them so you don’t have to, time to TALK ABOUT THEM.
We’re starting out this stream of Sally Hansen reviews with the newest release in the Miracle Gel line. The Miracle Gel line is their most expensive, with the larger bottles, and they just look the fanciest. With any of these “gel” lacquer lines, you don’t need a lamp or to cure it at all – but they’re not going to wear long term like gel. I fully ignore the Gel claims and just treat them like regular lacquer, which they are.
This particular release is called the ‘Totally 90s’ collection, and with that we have 8 shades in a rainbow of creams and shimmers, all inspired by the bright colors of the previous decades. I was so excited for those colors right away, so I had to see what we were working with.
You can find these at Sally Beauty (for a discount!) as well as at Walgreens and other drugstores.
Alright they’ve been waiting long enough, let’s look at the swatches!
***
This is the first post that’s skipping the Instagram line (too many polishes, too little Instagram posts) so live swatch videos are embedded in the post after the photo swatches, instead of linking out to Instagram.
***
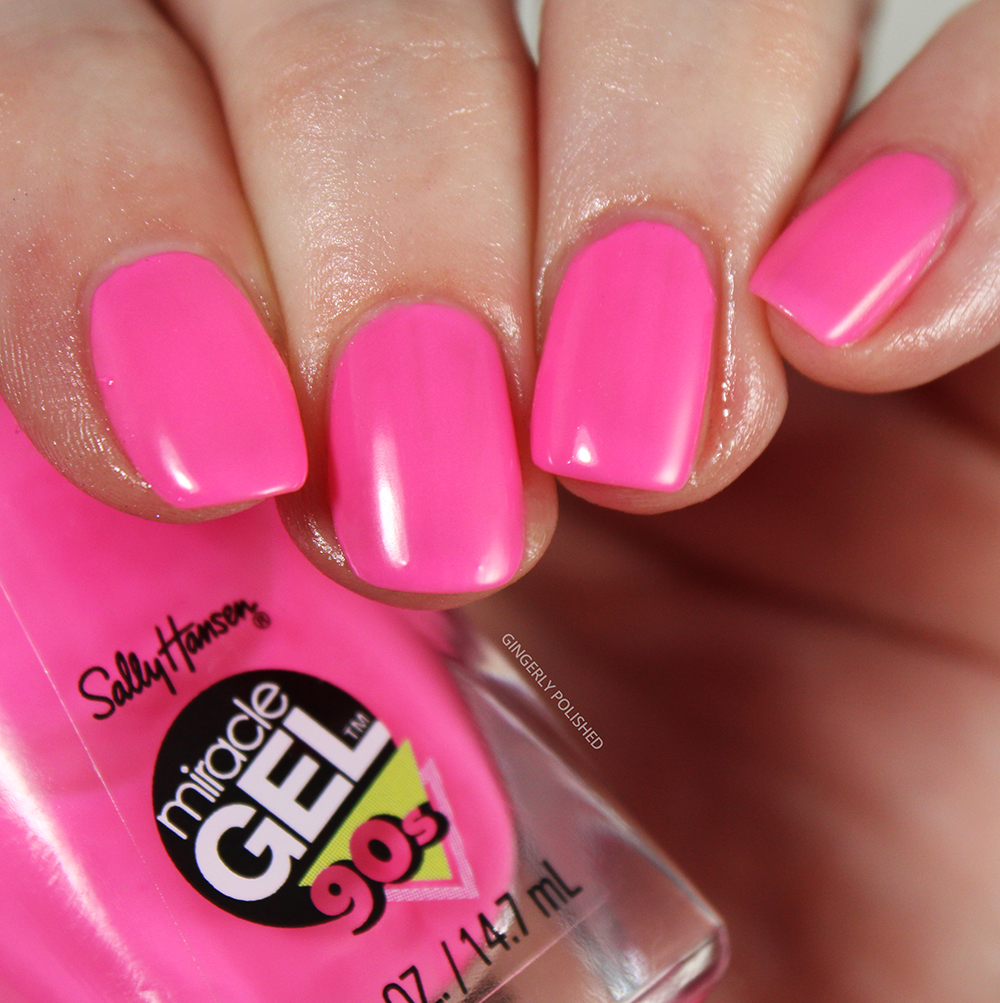
You know me, I can’t resist a rainbow order for swatching. So we’re starting out with ‘Beet Me at the Mall’. (I get the pun with the name and you know beets are pink, but all I keep thinking of is a brawl at the mall). This is a bright, saturated fuchsia pink jelly base filled with a delicate silver shimmer.
I did notice most of the shades in this set are more sheer overall, especially with these shimmers (maybe to evoke the jelly shoes and furniture of the 90s?) so I know they won’t be for everyone. This shade is 3 thinner coats built up and you can still see a touch of my nail line peeking through – which could be even more noticeable on longer nails. I don’t mind the more sheer look on this specific shade and with this shimmery jelly finish, but of course it’ll all depend on your own preferences.


***
Next up we have our first cream of the set. This is ‘Nostalchick’ and it’s a bright, neon warm toned pink cream.
Now, you’ll be able to see this in the live swatches as well, but the creams in this set are definitely more sheer and thinner overall. I know neons can be more finicky just in general, but these gave me even more trouble than other neon formulas. This particular shade felt the most pigmented and easiest to work with of the bunch, and I was able to get a smooth and opaque finish with 3 coats. With all of these shades I highly suggest floating the polish on to help you get the smoothest finish – that involves placing the brush more horizontal as you apply, and with as little pressure as you can. If you’re putting a lot of pressure on the brush, you can pull the polish more and create more streaks (which you can see happen a touch with the blue cream further down).
Of course, do keep in mind my nails are also very ridged naturally – that is always going to cause more streaks in any polish I apply, and often makes me add another coat that most others won’t need. As always this is how shades apply on my own personal nails, but you’ll still be able to gather how it’ll work on your own nails. With this shade, most people will be set with 2-3 coats.
***
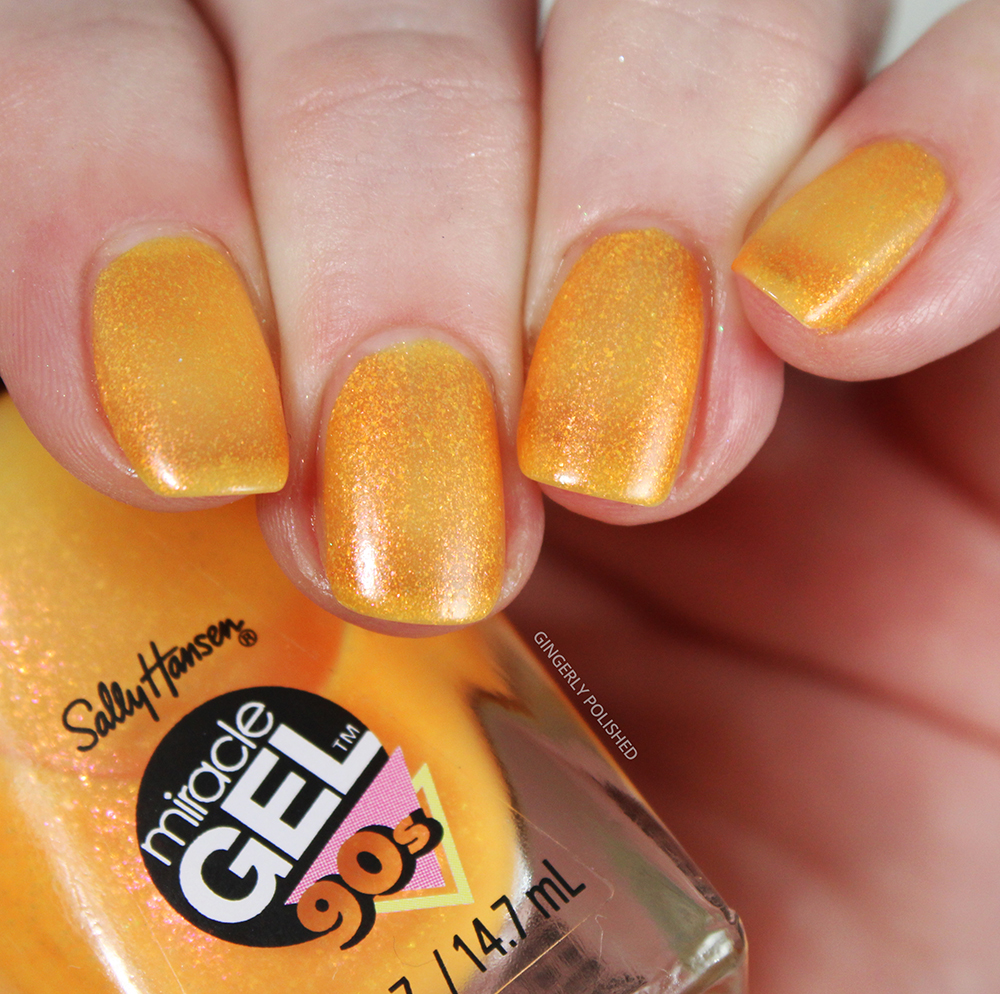
Next we bounce back to another shimmer. This is ‘Be bRight Back’ (you see what they did there) and it’s a warm toned, bright orange jelly base filled with golden-orange shimmer all throughout.
This one is fully rocking that sheer jelly finish, even more than that first fuchsia shimmer. I had very visible nail line after 3 coats, but it is smooth and even on the nails. I do believe these meant to be a more sheer look overall, but of course it’ll depend on your own preferences – not everyone loves a jelly look, and that’s just fine!

***
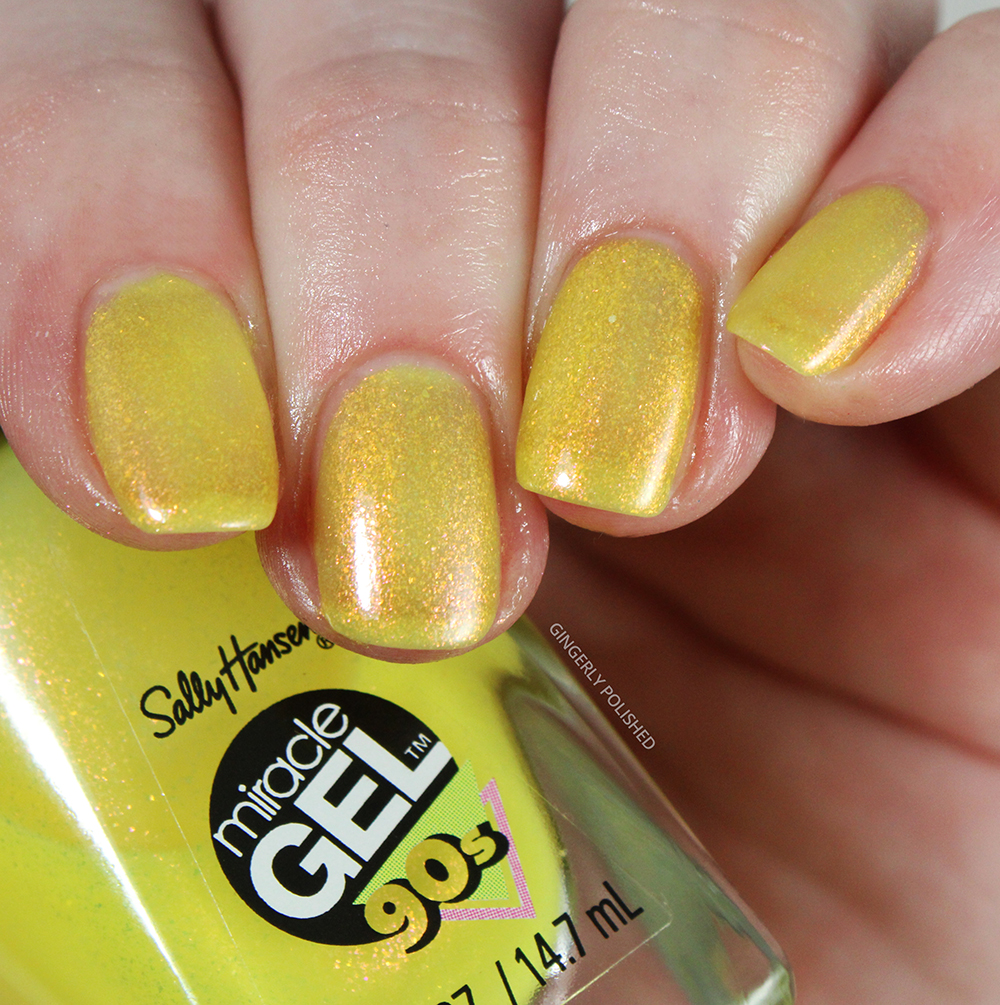
Now we have ‘Mixtape’. This is the lemon yellow version of the shade above, a bright warm toned yellow jelly base filled with an orange shimmer.
Again, one of the more sheer shades of the bunch, with visible nail line still showing after 3 coats. All of the same notes I had for the orange above apply here as well.

***
Next up we have another cream. This is ‘Toadally Buggin’ and honestly, great name. (Especially as I just watched Clueless so recently). This is a bright highlighter yellow cream shade, one might even say a very yellow-toned light green. I did put it in the green space in the swatch rainbow I have here.
Again with it being a neon, especially a yellow-based neon, it was bound to be a touch more sheer and finicky. This is 3 coats, and you can see I do still have some patches peeking through. Of course the ridges in my nails are contributing to that, so if you smoother nails you should be set with 3 coats. Not my favorite neon yellow formula I’ve seen, but could be worse.
And I’m sure people will say it just needs a white base – anytime I swatch any polish, especially neons, I like to show them just on their own. Not everyone is going to, or even wants to, go through the work a white base. I have plenty of neons that don’t need a white base, so that’s a benchmark I use for any other neon formula.

***
Now this next one was surprisingly one I had the most issues with. This is ‘Did I Blue That?’ (you better have read it in his voice) and it’s a bright aqua blue cream shade. It has some definite green tones to it, keeping it from a sky blue.
As you can see I definitely have some larger streaks in this one still after 3 coats – the polish just didn’t want to fully smooth out at the end of my nail, and just wasn’t a great formula. Sure, you can say I’m docking points when the ridges in my nails are partly contributing to more of the streaks – but other people deal with this too, and I have plenty of polishes that more easily cover them. Again, this blog is always my own experience, but it’s a benchmark that everyone can glean information from.

***
Our last shimmer of the bunch is ‘Frosted Tips’ (and what a hair style that was). This is a soft purple-toned base with bright pink shimmer all throughout.
Another jelly base on this one, but I found it was a touch more opaque than others, probably because of the deeper color. I was able to get this pretty well opaque with 3 coats – though you’ll see just the tiniest amount of nail line still peeking through. It’s gorgeous, and definitely one of the top formulas of this set.


***
Now we round up the whole set with our last cream! This is ‘Nice Nice Baby’ and it’s lightest of lilac purples, maybe even an orchid pink cream shade. Again, a touch more neon so you’ll get a touch more of that thinner formula.
This one was definitely one of the thinnest, as you can still see my ridges peeking through after 3 coats. Not a favorite, and I have shades very similar to this with better formulas. Little bit of a whomp whomp to end.

***
Do you feel transported tot he 90s now. I’ll give it to them, it really is a fun color palette, and I love the colors here, especially all together. But, unfortunately not with the best formulas. The shimmers are workable and usable, but I had a lot of issues with streaks and thinner formulas with the creams. Overall I think the creams are a pass, as I’ve found similar shades with better formulas. But if you love the look of the jelly shades, and their more sheer finish, I can recommend them!
Are you interested in any of these?
********
Upcoming Posts
Orly x Kelli Marissa Remix collections • ILNP Fairy Forest collection • ILNP Under the Sea collection • Orly Plot Twist Fall 2023 • Sally Hansen x Sesame Street collection
********
Follow me!
Instagram: @GingerlyPolished
Pinterest: @GingerlyPolished
Beyond Polish: GINGERLYPOLISHED for 10% off (affiliate code/link)
